I was discussing LCD display options for projects with a friend, when I remembered that I bought this nice OLED display (possibly even pre-ordered it?) years ago, and never bothered to actually hook it up. Thus, tonights project. The display itself is a 128×64 pixel yellow monochrome OLED made by Osram Opto Semiconductors (part #OX128064PK16MY0A00). It looks like it is no longer being made, but digikey has some stock of a similar one (OS128064PN10MO2B10) for about $20. There were three challenges: building a connector for the tiny ribbon cable, figuring out a schematic, and getting some software for it. The setup mostly works except the image is not centered- I have a feeling that my display is slightly incompatible with the newer one. Big thanks to Wolfgang Astleitner (mrwastl) for developing serdisplib! Details after the break.

Part 1 – Building The Header

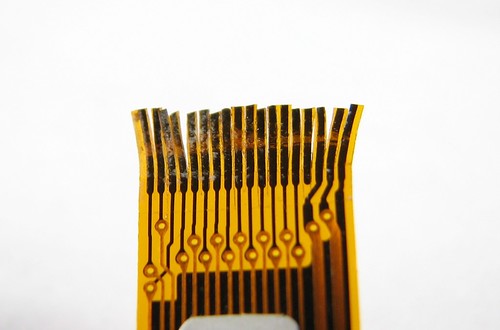
The first hurdle to overcome is figuring out how to connect to this fairly tiny connector (it is about 1cm wide). The sane way to do this is buy a connector and a breakout board, however I had mutilated this cable years ago so I was stuck with option two: soldering up wires to each of the connections. This actually isn’t that rough. First, you use a razor to cut the flexible board between each connection, so that they can be bent up and down (as pictured above). Then, smallish wires can be soldered to each lead by bending it away from the others, heating it with the wire next to it, then bending it out of the way once it cools. Here you can see some completed wires being held out of the way by tape:

It helps if the wires are tinned ahead of time. I used alternating colors for the wires so that they would be easy to keep in order. This is what mine looked like after I finished soldering the wires up:

Once this is completed, the next part is to tape all the wires together so that they can’t short to each other. To accomplish this, the wires should first be split into two groups of alternating wires. If alternating colors are used, this just means separate the colors. Next. bend every other wire from one of these groups (they should have three wires between them), and stick a piece of scotch tape all the way down between them and the other half of the same-colored wires. Then, tape down the rest of the same-colored wires using another piece of scotch tape, and repeat this process on the second color. Be sure to position the wires so that they are in order. Mine ended up looking like this:

The hard part of the connector is done now. The final step is to solder each of the wires to a header so that it can be stuck into the breadboard:

Ok, now thats done, time to build the rest of the circuit.
Part 2 – Connecting It Up
There is some good information for connecting up the OLED display to a parallel port on the serdisplib site. Unfortunately, they describe a slightly different hardware version than mine, so I had to go hunting for the correct datasheet. Thanks to Google, I found it on an old page on the Digikey site (cached here). The schematic from Osram is pretty information-poor, so it is fortunate that Wolfgang provided a reference to work from. Here is the schematic:

And the completed circuit:

Part 3 – Software
This part is pretty straightforward (ha-ha), assuming you have a Linux system available :-). Get serdisplib and compile it:
wget http://downloads.sourceforge.net/serdisplib/serdisplib-1.97.7.tar.gz
tar -xf serdisplib-1.97.7.tar.gz
cd serdisplib-1.97.7
./configure
make
You may need to install some libraries to get it to work- I was missing libgd on my machine (Ubuntu package libgd2-noxpm-dev).
This actually builds a library that can be used to interact with the display, but that will come later. For now, use the multidisplay program to display a picture and a message:
tools/multidisplay -n OLED128x64x4 -o "CONTRAST=9;INVERT=0;ROT=180" -f squirrel_small.png -M "We like squirrels \ \ \ \Thanks to serdisplib"
Which results in:

Note that the bottom rows of the display are missing- the display is actually shifted up by 12 pixels. I fixed this by editing lines 642-3 in src/serdisp_specific_ssdoled.c from:
    serdisp_ssdoled_writecmd (dd, 0xA2);  /* set display offset */
    serdisp_ssdoled_writecmd (dd, 0x44);
to:
    serdisp_ssdoled_writecmd (dd, 0xA2);  /* set display offset */
    serdisp_ssdoled_writecmd (dd, 0x51);
After recompiling, the full image works:

I will talk to the driver author to see if a switch can be added to fix this in the library.
Conclusion
I didn’t expect to have something working in one night, so hurray! Maybe it would be fun to write a driver for the Arduino platform…

Very nice, what are you planning on doing with the oled display ?
I’m not sure yet… I don’t think I had anything in mind when I got it in the first place. Perhaps a watch, if it can be made to talk to a microcontroller.
Well you connected it to the parallel port so theoretically you should be able to connect it to a micro (with alot of pins) and control it. Although you’ll need to either find the protocol (by disecting the code of serdisplib maybe?) or trace the signals with an oscilloscope. I’ve never done that but me thinks it should be possible. Either way, looks like alot of fun.
I’m hoping so :-). Yeah, the code for serdisplib looks really well written, and contains everything needed to get the display going on a micro. I’m actually wondering now if it would be possible to just port parts of the library over, so that one could also take advantage of the other displays that it supports.